How to Replace Cabin Filter for Clean Air in Your Car?
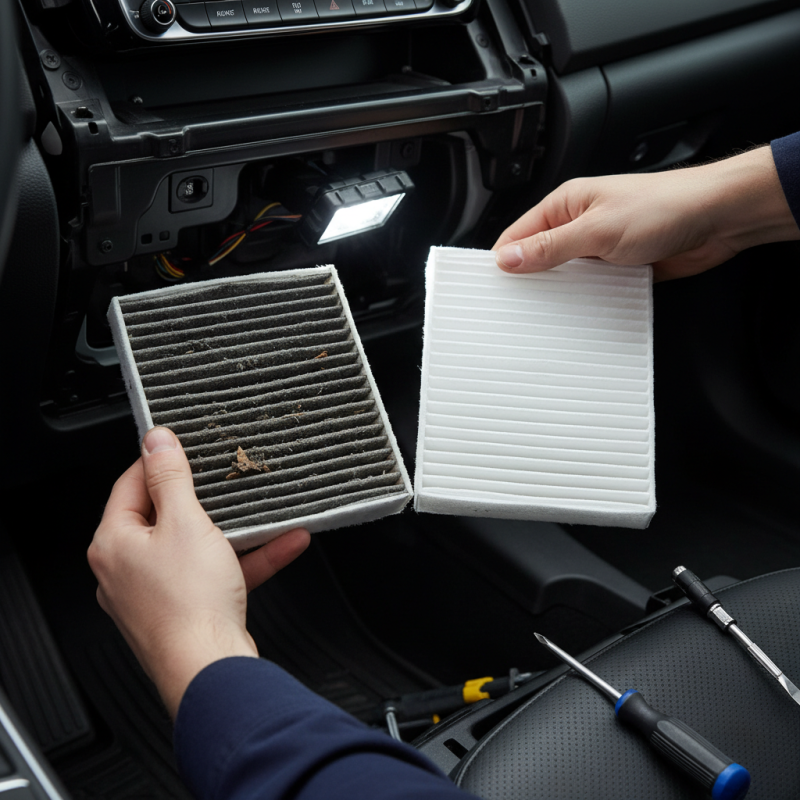
Maintaining clean air in your car is essential for your health and comfort. A crucial component in achieving this is the Cabin Filter. This filter traps dust, pollen, and other pollutants, ensuring that the air you breathe inside your vehicle is fresh. Over time, however, this filter can become clogged and ineffective. When this happens, you might notice unpleasant odors or even a decrease in your car's air quality.
Replacing your Cabin Filter is a straightforward process. It can be done at home with minimal tools. Understanding the importance of this simple task can prevent discomfort and health issues caused by poor air quality. Many car owners overlook the state of their Cabin Filter, thinking it will last forever. Neglecting this filter can lead to regrets down the road.
A clean Cabin Filter contributes greatly to your driving experience. It's a small part, yet it plays a big role in your car’s environment. Taking the time to check and replace it regularly ensures you breathe easy. Don't wait until issues arise—consider your Cabin Filter today.
Understanding the Importance of Cabin Air Filters in Vehicles
Cabin air filters play a crucial role in maintaining clean air inside your vehicle. They filter out dust, pollen, and pollutants. This is vital, especially for people with allergies. A clogged filter can lead to poor air quality and make it harder to breathe. Many forget this small yet significant component.
Regularly replacing the Cabin Air Filter ensures a pleasant driving experience. It allowsfresh air circulation and protects your HVAC system. However, many car owners neglect this task. Often, filters sit way too long without being checked. This can lead to unpleasant odors and reduced airflow.
Be mindful of your driving environment. If you often drive in urban areas or near construction sites, the filter can clog faster. Replacing it every 12,000 to 15,000 miles is a good rule of thumb. Neglecting this can impact your health and comfort in the car. Remember, clean air is essential for everyone on the road.
Identifying the Right Cabin Filter for Your Car Model
When looking to replace your cabin filter, identifying the right one for your car model is crucial. Cabin filters come in various sizes and shapes, tailored for different vehicles. Checking your owner's manual can provide specific information about the filter required for your model. It may list the part number, size, or even the type of filter needed.
You might assume all filters are the same, but that’s not true. Some filters include activated carbon that helps to remove odors, while others focus solely on filtering dust and pollutants. Pay attention to the specifications that matter. Visiting an auto parts store can also help, as many staff members are knowledgeable about common filter types for different models.
One penultimate detail many overlook is the installation process itself. Ensure you have the right tools ready. It’s common to face challenges during installation, like tight spaces or tricky screws. Reflect on these moments; they can be a learning experience. Adjusting your technique or asking for help can simplify the process significantly.
Step-by-Step Guide to Accessing the Cabin Air Filter
Replacing the cabin filter is essential for maintaining clean air in your car. Poor air quality can lead to serious health issues. According to the Environmental Protection Agency, indoor air quality can be even worse than outdoor air. This makes replacing your cabin air filter a necessary task.
To access your cabin air filter, start by checking your vehicle manual. Access points can vary significantly between models. Typically, the filter is located behind the glove compartment or under the dashboard. Once located, remove any panels or screws holding the filter in place. Gently pull out the old filter. Inspect it for dirt and debris. Often, a dirty filter can reduce air flow by up to 50%.
Tips: Remember to wear gloves when handling the filter. This prevents skin irritation from accumulated dust. Clean the surrounding area to avoid reintroducing contaminants. Once the new filter is in place, secure everything back. Always check the manufacturer's specifications for the correct replacement part.
Regular maintenance is key. A well-maintained filter can improve HVAC efficiency. It’s recommended to replace the cabin filter every 15,000 to 30,000 miles, depending on driving conditions. However, if you frequently drive in heavy traffic or dusty environments, consider replacing it sooner. Ignoring the filter can lead to musty odors and even affect overall vehicle performance.
How to Replace Cabin Filter for Clean Air in Your Car? - Step-by-Step Guide to Accessing the Cabin Air Filter
| Step | Description | Tools Needed | Estimated Time | Frequency of Replacement |
|---|---|---|---|---|
| 1 | Locate the cabin air filter access panel. | Screwdriver | 5 minutes | Every 12,000 to 15,000 miles |
| 2 | Remove the screws and open the access panel. | Screwdriver | 10 minutes | Every 12,000 to 15,000 miles |
| 3 | Carefully pull out the old cabin air filter. | N/A | 5 minutes | Every 12,000 to 15,000 miles |
| 4 | Insert the new cabin air filter according to the airflow direction. | N/A | 5 minutes | Every 12,000 to 15,000 miles |
| 5 | Reattach the access panel and secure with screws. | Screwdriver | 5 minutes | Every 12,000 to 15,000 miles |
Removing the Old Cabin Filter Safely and Efficiently
When replacing the cabin filter in your car, safety is paramount. Start by gathering necessary tools. You may need a screwdriver, gloves, and a flashlight. Clear the area around the filter. This space can get cramped. Be mindful of any delicate components, as they can break easily.
Begin removing the old filter carefully. Check for the direction of airflow; it’s crucial for proper installation of the new filter later. Pull out the filter gently to avoid dust clouds. You might encounter stubborn clips or tabs. Don't rush; forcing them can cause damage. Take a moment to inspect the old filter. A dirty filter indicates a need for more frequent changes.
Installing the new filter involves similar caution. Ensure a snug fit to prevent any air leakage. Sometimes, fitting can be tricky due to tight spaces. If it doesn't go in right away, don't apply excessive force. Reflect on this—taking time to do it right pays off. After installation, clean your hands and recheck everything. Turn on the car and listen for unusual noises. A clean air experience is the goal, but don’t overlook the details; a small mistake can lead to future issues.
Installing the New Cabin Filter and Ensuring Proper Fit
Changing the cabin filter in your car can seem daunting. However, it’s a straightforward process that can greatly improve air quality. Start by locating the cabin filter. It is often hidden behind the glove compartment or under the dashboard. Remove any screws or clips holding it in place. Be gentle. Some parts may feel stubborn.
When installing the new cabin filter, ensure it fits securely. Pay attention to the airflow direction. Most filters have arrows indicating which way the air flows. Inserting it incorrectly will limit its effectiveness. Slide it in carefully to avoid disturbing the car's interior. Test it by running the air system. Listen for any unusual noises.
Tips: Always check your owner's manual for specific instructions. Do not rush the process. A proper fit removes allergens and dust better. If the filter is significantly dirty, consider cleaning the surrounding areas before installation. Remember, your health depends on the air you breathe in your car. Even small mistakes can affect air quality. Be mindful when installing the new filter to ensure a clean ride.